To
Dye For!
A reader suggested this week’s topic, dyeing fur and feathers for fly tying. It’s timely,
because lately I’ve had a dye pot going every day or so. I’ve been dying cream cock and hen saddle hackles to
get those unique colors that are local favourites, and also coyote fur. A lot of coyote fur, actually, as my buddy at River
Magic has six more coyote pelts reserved for dyeing, with more on order.
First, we’ll recommend a great book on the subject, Dying and Bleaching
Natural Fly Tying Materials, by A.K. Best, Lyons Press, Guilford, Connecticut, 2004. Until I got this book, my projects
were rather random experiments, as my results clearly demonstrated. Dyeing instructions sometimes accompany purchases of Veniard
fly tying dyes from England, but I’ve sometimes been led astray by these instructions. They’re useful as rough
guidelines, at best, in my opinion.
Veniard dyes have, however, long been the best available in the industry. I use them because I feel
reasonably secure entrusting expensive materials to their care, and have found that they yield fairly consistent results.
However, others who are not afraid to experiment obtain great results from fabric dyes such as Rit powder dye and even concentrated
Kool-Aid! It seems that as long as you can fix the color (make it resist fading) with an acid, usually
acetic acid, more commonly known as vinegar, it works. By the way, in jolly olde England, in Victorian times, fly tyers swore
by donkey urine (uric acid) as the ultimate fixative. Why donkey urine, with the obvious problems inherent in collection,
we don’t know, and can only guess that these tyers were trying to enhance the mystique of their craft. Possibly they
actually used uric acid from a more convenient source.
Anyhow, the process is simple. First, soak your fur or feathers in a bucket of
hot tap water (2 – 3 gallons) and at least ¼ cup of a liquid soap, such as Ivory dish washing soap, for 24 hrs
or so, stirring occasionally. This removes natural oils and gives your materials the ability to readily accept dyes. I just
leave the mix, with stirring, for one to several days – no precise timing required.
Rinse thoroughly before you put your materials
into the dye pot, but don’t let them completely dry. My dye pot is an uncovered slow cooker which, at low setting, will
keep the temperature of the dye bath at a maximum of 140 degrees F. Above this critical temperature, fur or feathers can be
permanently damaged, and the skin of pelts or capes permanently shrivelled. To prepare the dye bath, add about two litres
of water and bring the temperature to about 130 F. Add dye while stirring until the bath is a very deep shade
of the color you desire, then add three or four tablespoons of white vinegar. Test temperature and adjust it if necessary,
remembering never to exceed 140 F.
Add materials while stirring and remove them when they appear about 2 shades darker than you want.
They will appear lighter when dried, hopefully about the right shade. This process may take seconds, minutes, hours or even
overnight, and I’d suggest that, as a safety precaution, you turn off the heat source if you must leave the project
– the dyeing process will continue even in cold water. Also, gently stir the bath whenever you can. I’d also suggest
that you not throw out the dye bath until you dry your materials and are satisfied that they don’t need to be dyed a
deeper shade. If you decide to add more dye, remove the materials, add dye and stir, then return the materials to the bath.
This prevents spotting caused by bits of highly concentrated dye. When drying materials, I find that a clothesline, indoor
or outdoor, is hard to beat. A hair dryer can be used, but it may shrivel up the pelts or overheat delicate materials. As
with most projects, it’s best not to be in a rush.
One final tip, this one regarding black dye – Deepest black is usually obtained
if you dye red first, then black. In fact, if you are dying materials several colors, always do black last, since any disappointing
shades can always be dyed black in the end, wasting nothing.
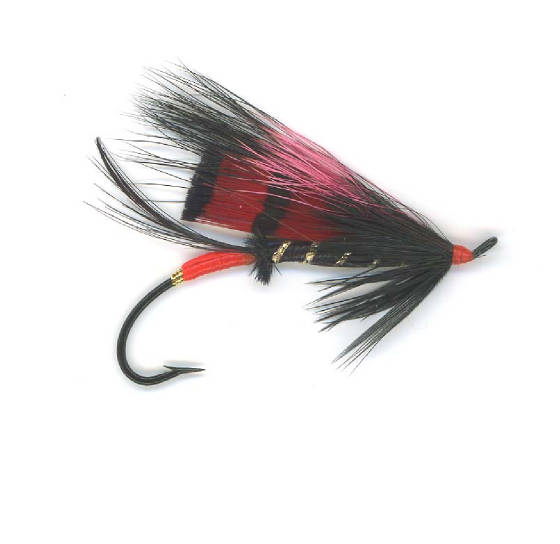
Now, here’s a scorching hot fly featuring dyed coyote:
That
Bloody Coyote
Thread:
Red GSP 50 Denier
Hook:
Partridge Bartleet Traditional, size 2 – 1/0
Tip:
Gold Flatbraid
Tag:
Fluorescent red floss
Tail:
Golden pheasant crest dyed black
Rib:
Gold Sparkle Braid
Body:
Black Antron yarn
Underwing:
Golden pheasant tippets dyed red
Hackle:
Black hen hackle
Wing:
Coyote dyed fuchsia
Head:
Red thread finished with glossy head cement
Please stay on the line …